


The Art of Making the Perfect Snowman
Even though snow days are officially over (thanks a lot, Zoom), learn the best techniques to make a foolproof snowman!
With the seemingly everlasting cold weather of February comes nature’s literal and metaphorical icing-on-top: snow. For most students, snow and snow days are synonymous with time spent relaxing and using a much-needed mental break. The most pressing issue I’ve had to consider with snow days is how best to spend the unforeseen time off. While this might mean a variety of activities, one that is always on my to-do is making a snowman.
Now, don’t laugh. (Okay maybe a little.) Making a snowman, or snow art more broadly, is way too much fun to overlook. And getting it down to an art form can take time and patience. Over the years, I’ve made many…
many…
snowpeople. At this point, I would like to say I’ve perfected the art of snowman building. With winter still going strong and the promise of more snow coming our way, here are my tips to making an amazing snowman:
- Firstly, a good snow structure is crucial to a snowman’s success. Try making a small snowball. If it doesn’t seem to be sticking together, or “packing,” properly, today’s probably not the best day to make it. You can still try, of course, but other winter activities like sledding or making snow angels might be more the move.
- If the snow seems good enough, you can continue! One important aspect of snowman making to keep in mind is the overall appearance of the final product, including how the ground around looks. To combat this issue, I’ll typically try to get the snow from all over our yard, rather than just the area directly around the base of the snowman. To make this snow transportation easy, I use a sled.
- Once I’ve found a patch of snow that I’m “importing” from, it’s time to start rolling the balls. To do this, I tend to “hug” the snow. This is how I get my starter ball. By “hugging” the snow into a starter ball, the core of the snowman will be well packed. This will allow for the snowman to stay up longer (rather than collapse soon after the build with a wind gust).
- Once you’ve made your starter ball, roll the ball along the ground, paying attention to how much snow you’re picking up. You should pay attention to how much snow you’re picking up for two reasons. Firstly, you need to make sure that the sizes are proportional to how you want the bottom, torso, and head to be. Secondly, if you’re picking up too much snow, you might accidentally leave some barren ground. Since this is in the “import” area, it’s not as big of a deal, but the barren ground can mean dirt-tainted snow, which is typically not ideal.
- When you’re satisfied with the size and look of your snowball, roll it onto your sled and transport it to the building area.
- Repeat steps 3-5 until you have your desired amount of snowballs (I typically go for three, but you could definitely do two or four – this is where your artistic liberties come in).
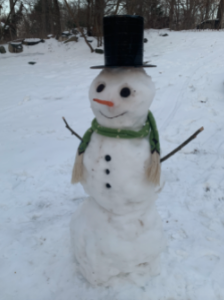
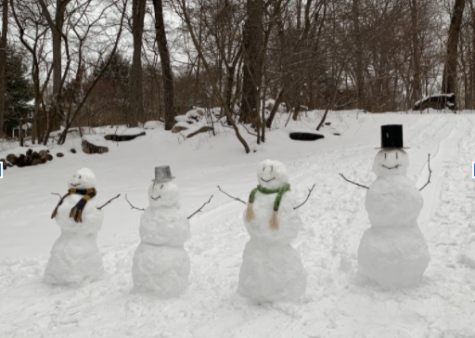
- Once you’ve gathered all of your snowballs and stacked them on top of each other, congratulations: you’ve just made your base! Now, it’s time to decorate. I typically start with the face and then do outerwear. For the face, a myriad of things will work for the eyes, mouth, and nose; you don’t need to limit yourself! Be creative with this part. In the past, I’ve used Oreos, small stones, or buttons for the eyes, and curved twigs, stones, or buttons for the mouth. I typically do carrots for the nose, but I’ve also gone noseless before or will otherwise use twigs. For this step, I’ve found it helpful to really know your backyard! Think back to when there wasn’t any snow: where could you find the most branches? The most stones? Is there anything else about your backyard geography that could help? For outerwear, the one consideration I think about is how near and dear the article of clothing is to me. If I wouldn’t mind it being outside for a bit, where it might have to endure the wilds of nature, then it’s a perfect fit for my snowman.
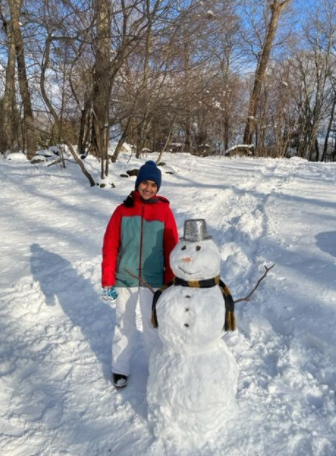
- Once you’ve finished decorating the face, and you’ve found outerwear to put on your snowman, you’ve successfully completed an awesome-looking snowperson! Congratulations! Once you’ve made it, take a picture, share it with others, and enjoy the company of your new friend.

When not writing or editing for GAP, Sara loves to bake with Chef's Table, the Great British Baking Show, or music playing in the background. She also...