


Fall Recipe: Patisserie-Quality Macarons
Are you bored and need something to do? Take a whirl at baking macarons with my tried and true recipe, perfected during quarantine.

Macarons have a bittersweet reputation: elegantly delicious, but difficult to make. However, with the right technique and a few practice runs, I will help you perfect this recipe and bring Paris to your kitchen.
I vividly remember my first time walking into Ladureé, arguably the most renowned patisserie for macarons, and seeing the rows of jewel-like pastries, all vibrantly colored and creatively flavored. I took it upon myself to replicate them during quarantine, when—let’s be honest—we all had too much time on our hands. The YouTube videos did not lie when they told me that macarons are truly one of the most finicky desserts to make. On my first attempt, I folded in my wet ingredients with the dry for too long, which yielded a cracked top. I even read somewhere that a rainy day can completely ruin your macaron due to the rise in humidity! These instances prove that macarons are so high-maintenance that even one small mistake can completely ruin your cookie. To truly perfect your macaron, you have to try different methods over and over again to see which one works the best for you.
Even though baking macarons are highly individual to every baker, I will guide you with the recipe that I use for macarons. Just remember: Don’t be deterred if you fail! It is inevitable and a part of the macarons-baking journey. Never give up, though, because I promise you that after every batch, you will gradually improve. As Mrs. King would say, “Macarons-ward!”
For the macaron shells, you will need:
- 100g fine blanched almond flour (I use the one by Red Mills)
- 75g powdered sugar
- 70g room temperature egg whites
- 75g granulated sugar
- ¼ tsp cream of tartar
- Gel/powder food coloring – optional, but recommended 🙂
- Sieve
- Kitchen scale
- Silicon mat/Parchment paper
- Baking tray
- Spatula
- Piping bag/plastic Ziploc
- Round piping tip (I use Wilton 2A)
Instructions:
- To prepare, take out your eggs (3 eggs yield around 70g egg whites) so that they can warm up to room temperature. This step is crucial because room temperature egg whites are ideal to create a stiff meringue needed for macarons. If you aren’t patient enough, like me, I have a trick! Simply fill a bowl with warm water and put the eggs in. You can tell if the eggs reach room temperature if the water around them turns cold over time or if the eggs don’t feel cold anymore.
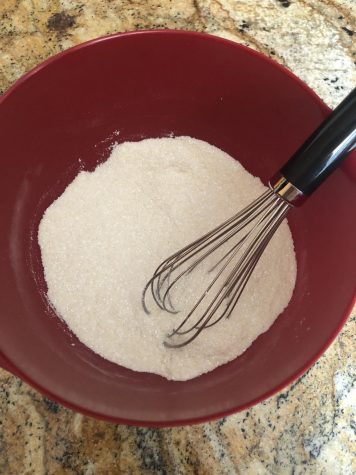
- Measure out your almond flour and powdered sugar on a scale. When finished, sift the almond flour and powdered sugar 3 times. Then, pour these dry ingredients into a bowl and whisk them until combined. These steps are to ensure that your macaron shells will be as smooth as possible. We don’t want any bumpy shells!
- Crack your eggs into a shallow bowl. Then, with clean hands, scoop out the yolks from the egg whites and set them aside. If any egg yolk is left over, the egg whites will not be stable enough to make a stiff meringue, so make sure you only have egg whites! Then, measure out 70 grams of the egg whites.
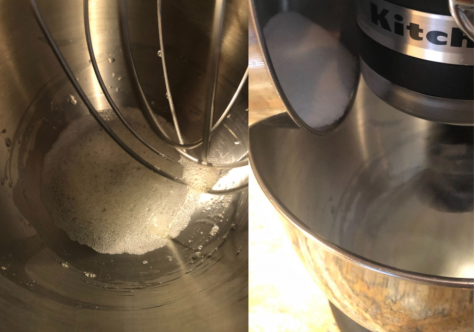
- Using a stand/hand mixer, start whipping the egg whites at low speed
- When the mixture starts to get foamy, gradually add in your granulated sugar in 3 intervals. Also, add in your cream of tartar to stabilize the egg whites for a perfect meringue!
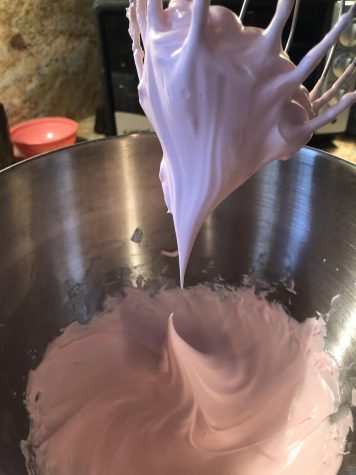
- Continue whipping the egg whites on a low-medium speed until it has soft peaks. At this stage, add in your desired food coloring.

- Start whipping the meringue at a medium-high speed until it has stiff peaks. You will know your meringue is ready if the peaks stick straight up after you pull your mixer out of the bowl. Also, the meringue should stay put when you turn the bowl upside-down over your head! Please check your meringue consistency periodically, though, for there is still a risk to overwhip it.
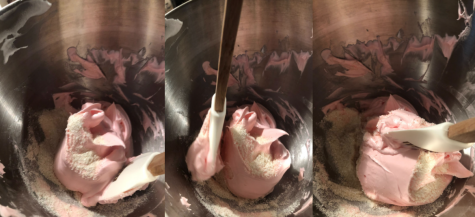
- Take your bowl off your mixer. Add in roughly a third of your almond flour and sugar mixture and start to fold them together with a spatula, being careful not to get rid of any air bubbles in your meringue. As demonstrated in the photos, I like to scoop under, go over, then cut the middle. Repeat this process until the dry ingredients are fully incorporated with your meringue.
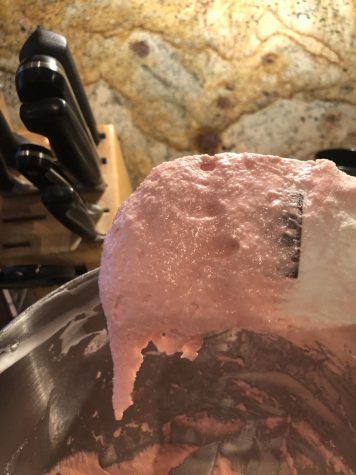
The texture now of your batter should be fairly lumpy and thick:
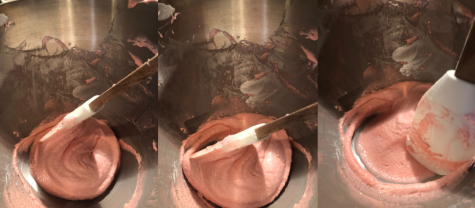
- Now, start your macaronage process. This is the most crucial part of baking macarons, so please be very attentive and check the state of your batter often. To start, fold your mixture and push out the air bubbles with your spatula. Similar to the folding step before, I like to scoop up and go over. However, instead of splitting down the middle, I like to use the flat side of my spatula and push out the air bubbles, like so.
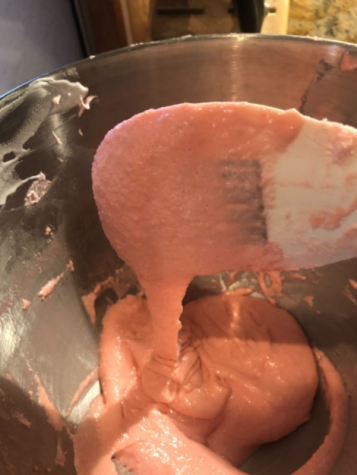
- Repeat this process until you have achieved a consistency like thick, flowing lava. In order to see if you achieved this texture, see if the batter flows consistently off of your spatula without any breaks. The batter should look like a ribbon when flowing off of the spatula, with thinner edges. However, it should be thick enough that it holds its consistent flow when making multiple figure 8 shapes.
![]()
- Fill a piping bag with your batter. The piping bag should be fitted with a round tip, preferably a Wilton 1A/2A. This will ensure a nice, round macaron.
- Put your parchment paper or silicone mat over your baking tray. Then, proceed to pipe the batter into circles. To make the best-shaped circles, I suggest printing out a template or purchasing silicon sheets with circles on them specifically for macarons. Hold your piping bag fairly close to your surface, making sure it is vertical and perpendicular to the surface. Then, apply continuous pressure lightly and release pressure once you are done. Repeat this process until there is no more batter remaining in the bag.
- Preheat your oven to 300 F. In the meantime, leave your piped macaron batter out for 20-30 minutes so that it develops a “skin” over the batter. You know it will have developed it when nothing sticks to your finger when you lightly touch the batter. This step ensures that the macarons will yield a more consistent result with prettier feet and shells.
- Once this time elapses, pop your baking tray in the oven (convection ovens yield better results as the airflow is better) for 15 minutes. Once out of the oven, lightly push the side of one macaron shell. If it stays put, the macarons are done baking; however, if it moves, pop it in for one more minute. No worries if you slightly overbake them because the shells can be easily softened up when coated with a thin swipe of milk.
- Let your macarons fully cool before delicately peeling off each shell from your baking surface. Warm macarons make it harder to do this! You can lightly peel it off with your fingers, or you can use a knife to pop it up.
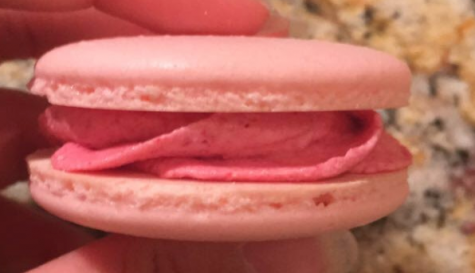
- Pair similarly shaped macarons together and put any filling you desire between them. I like to pipe on Swiss buttercream, but you can use anything from jams to ganaches. Be creative!
- Voila! You are done! Store your macarons in an airtight container in the fridge and serve at room temperature. Enjoy!

When not writing or editing for GAP, Sarina is watching figure skating re-runs, testing daunting recipes, or playing with her dog, Milo. She also loves...